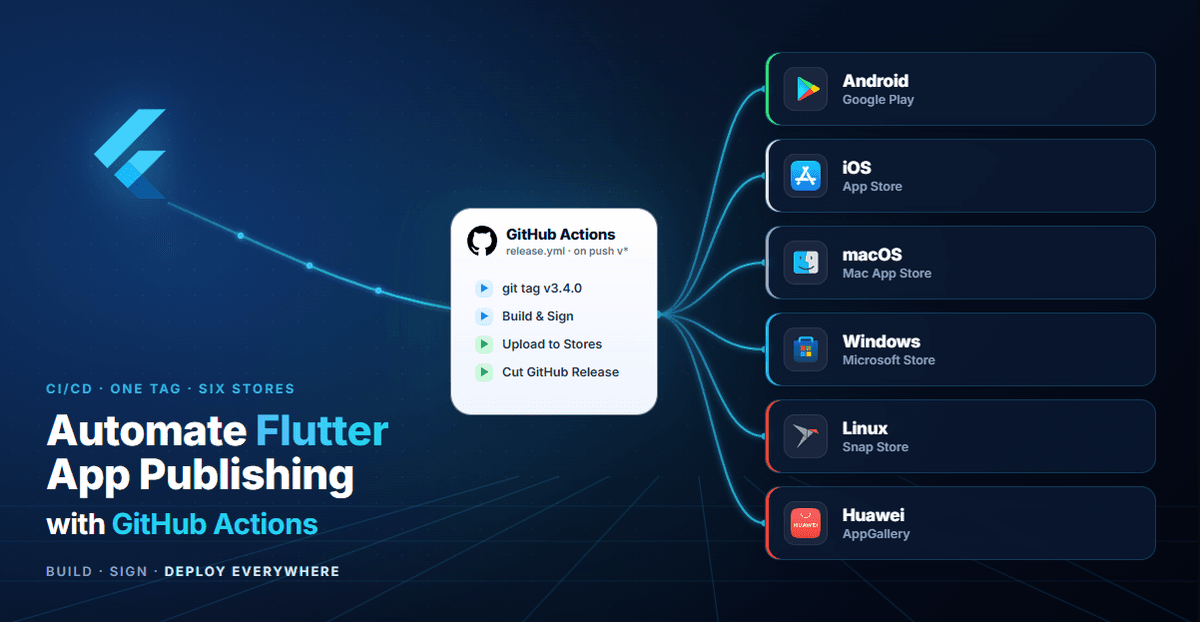
How I Automated Publishing My Flutter App to 6 Stores with GitHub Actions
One git tag builds Android, iOS, macOS, Windows, Linux, and Huawei — and ships every binary to its store. A complete walkthrough of the release pipeline, including every signing and API obstacle along the way.
A Flutter app can target six platforms from one codebase. The reward is reach; the tax is release work. Publishing Huda, a full-featured Islamic companion app, meant shipping to Google Play, the App Store, the Mac App Store, the Microsoft Store, the Snapcraft Store, and Huawei AppGallery — each with its own signing model, its own upload API, and its own way of failing.
Doing that by hand, six times, for every release, is not a plan. So I built a single GitHub Actions pipeline: I push one git tag, and minutes later the new build is uploaded to all six stores.
This article walks through that pipeline end to end — the architecture, the signing setup for each platform, and the obstacles I hit (especially the couple Huawei doesn't tell you about). If you maintain a cross-platform Flutter app, you can lift most of this directly.
The Shape of the Pipeline
The whole thing is one workflow file triggered by a version tag:
on:
  push:
    tags:
      - 'v*'
  workflow_dispatch:
    inputs:
      dry_run:
        description: 'Build only — skip store uploads'
        type: boolean
        default: false
Two design decisions matter here:
- Tag-driven. Releases are a deliberate act —
git tag v3.4.0 && git push --tags. Nothing publishes on a normal commit. - A
dry_runescape hatch. Every upload step is guarded withif: ${{ !inputs.dry_run }}. Running the workflow manually with the box checked builds all six platforms and uploads nothing — invaluable for verifying a green build without burning a store submission.
Each platform is an independent job, so they run in parallel and a failure on Windows doesn't block the iOS upload:
jobs:
  build-android:   # AAB → Google Play
  build-ios:       # IPA → App Store
  build-macos:     # pkg → Mac App Store
  build-windows:   # MSIX → Microsoft Store
  build-linux:     # snap → Snapcraft
  upload-appgallery:  # AAB → Huawei (needs: build-android)
  create-release:     # collect every artifact → GitHub Release
Pin Your Actions by SHA
Every third-party action is pinned to a full commit SHA, not a floating tag:
- uses: actions/checkout@34e114876b0b11c390a56381ad16ebd13914f8d5 # v4A tag like @v4 can be force-moved to point at new code; a SHA can't. When a workflow holds your signing keys and store credentials, supply-chain integrity isn't optional — pin everything.
The snippets throughout this post use floating tags (
@v1,@v4) for readability. In the actual workflow, every one of them is pinned to a full commit SHA with the version in a trailing comment, exactly as shown above.
The Secret Every Job Needs
Huda keeps API keys in lib/core/keys/hadith_key.dart, which is gitignored. CI can't compile without it, so the first step of every job recreates it from a base64 secret:
- name: Create API keys file
  env:
    DART_KEYS_FILE: ${{ secrets.DART_KEYS_FILE }}
  run: |
    mkdir -p lib/core/keys
    printf '%s' "$DART_KEYS_FILE" | base64 --decode > lib/core/keys/hadith_key.dart
This base64-decode-a-secret-into-a-file pattern repeats constantly across the pipeline — keystores, certificates, API keys. Anything binary or multi-line becomes a base64 string in GitHub Secrets and gets decoded back at runtime.
Android → Google Play
Android is the gentlest of the six. Decode the keystore, write key.properties, build, upload.
- name: Decode Android keystore
  env:
    ANDROID_KEYSTORE_BASE64: ${{ secrets.ANDROID_KEYSTORE_BASE64 }}
  run: printf '%s' "$ANDROID_KEYSTORE_BASE64" | base64 --decode > android/app/keystore.jks

- name: Create key.properties
  env:
    ANDROID_STORE_PASSWORD: ${{ secrets.ANDROID_STORE_PASSWORD }}
    ANDROID_KEY_PASSWORD: ${{ secrets.ANDROID_KEY_PASSWORD }}
    ANDROID_KEY_ALIAS: ${{ secrets.ANDROID_KEY_ALIAS }}
  run: |
    cat > android/key.properties <<EOF
    storePassword=$ANDROID_STORE_PASSWORD
    keyPassword=$ANDROID_KEY_PASSWORD
    keyAlias=$ANDROID_KEY_ALIAS
    storeFile=keystore.jks
    EOF
The upload itself is a well-maintained community action. The Play Store wants an AAB (the APK is built only as a GitHub Release asset for sideloaders):
- name: Upload to Google Play
  if: ${{ !inputs.dry_run }}
  uses: r0adkll/upload-google-play@v1
  with:
    serviceAccountJsonPlainText: ${{ secrets.GOOGLE_PLAY_SERVICE_ACCOUNT_JSON }}
    packageName: com.aw.huda
    releaseFiles: build/app/outputs/bundle/release/app-release.aab
    track: production
    status: completed
    whatsNewDirectory: distribution/whatsnew
The whatsNewDirectory points at a folder of whatsnew-<locale> files — the same release notes get reused by Huawei later, so they live in one place.
iOS → App Store
iOS signing is where most pipelines drown in provisioning-profile management. The trick that avoids all of it: let Xcode manage profiles itself, authenticated by the App Store Connect API key.
- name: Archive iOS app
  run: |
    cd ios
    xcodebuild archive \
      -workspace Runner.xcworkspace \
      -scheme Runner \
      -configuration Release \
      -archivePath $RUNNER_TEMP/Runner.xcarchive \
      -destination "generic/platform=iOS" \
      -allowProvisioningUpdates \
      -authenticationKeyPath ~/.private_keys/AuthKey_${ASC_KEY_ID}.p8 \
      -authenticationKeyID "$ASC_KEY_ID" \
      -authenticationKeyIssuerID "$ASC_ISSUER_ID"
The -allowProvisioningUpdates flag plus the API key means no provisioning-profile secrets at all — Xcode creates and downloads what it needs on the fly. That deletes an entire category of expiring, hard-to-rotate secrets.
The certificates still have to live in a keychain, though. The job creates a throwaway keychain with a random password, imports the dev and distribution .p12 files, and tears it down afterward:
- name: Import certificates
  run: |
    KEYCHAIN_PATH=$RUNNER_TEMP/app-signing.keychain-db
    KEYCHAIN_PASSWORD=$(openssl rand -hex 32)
    security create-keychain -p "$KEYCHAIN_PASSWORD" "$KEYCHAIN_PATH"
    security set-keychain-settings -lut 21600 "$KEYCHAIN_PATH"
    security unlock-keychain -p "$KEYCHAIN_PASSWORD" "$KEYCHAIN_PATH"
    echo "$DIST_CERT_BASE64" | base64 --decode > "$RUNNER_TEMP/dist.p12"
    security import "$RUNNER_TEMP/dist.p12" -P "$DIST_CERT_PASSWORD" \
      -A -t cert -f pkcs12 -k "$KEYCHAIN_PATH"
    security set-key-partition-list -S apple-tool:,apple: \
      -k "$KEYCHAIN_PASSWORD" "$KEYCHAIN_PATH"
    security list-keychain -d user -s "$KEYCHAIN_PATH"

# ... and always clean up, even on failure:
- name: Cleanup keychain
  if: always()
  run: security delete-keychain "$KEYCHAIN_PATH" 2>/dev/null || true
Export and upload are handled by Fastlane (fastlane install_profiles, then fastlane deploy), all authenticated by the same API key. One App Store Connect key signs, exports, and uploads.
A note on runners: iOS and macOS jobs run on
macos-26. Since April 2026 Apple requires builds against the iOS/macOS 26 SDK, which ships with Xcode 26 — so the runner image is pinned, not left onmacos-latest.
macOS → Mac App Store
macOS is iOS with two extra wrinkles. First, the Mac App Store wants a signed installer .pkg, which needs a second certificate — the "3rd Party Mac Developer Installer" identity — used with productbuild:
- name: Create installer pkg
  env:
    MACOS_INSTALLER_IDENTITY: ${{ secrets.MACOS_INSTALLER_IDENTITY }}
  run: |
    APP_PATH="build/macos/Build/Products/Release/huda.app"
    productbuild \
      --sign "$MACOS_INSTALLER_IDENTITY" \
      --component "$APP_PATH" /Applications \
      build/macos/Huda-macOS.pkg
Second, because the macOS app uses entitlements (sandbox, network, location, audio), it needs a real provisioning profile. The job decodes it, reads its UUID with PlistBuddy, and drops it where Xcode looks for profiles:
UUID=$(/usr/libexec/PlistBuddy -c "Print UUID" /dev/stdin \
  <<< "$(security cms -D -i "$RUNNER_TEMP/macos.provisionprofile")")
cp "$RUNNER_TEMP/macos.provisionprofile" \
  ~/Library/MobileDevice/Provisioning\ Profiles/"$UUID".provisionprofile
From there, fastlane deploy uploads the signed pkg with the same App Store Connect key.
Windows → Microsoft Store
The Windows job produces an MSIX and pushes it with Microsoft's msstore CLI. Two details earned their keep here.
First, MSIX versioning is strict — it requires a four-part x.y.z.0 version, and it must match the store listing. Rather than hand-edit pubspec.yaml, the workflow derives it:
- name: Sync MSIX version from pubspec
  shell: pwsh
  run: |
    $content = Get-Content pubspec.yaml -Raw
    if ($content -match 'version:\s+(\d+\.\d+\.\d+)') {
      $version = $Matches[1] + ".0"
      $content = $content -replace 'msix_version:\s+\S+', "msix_version: $version"
      Set-Content pubspec.yaml $content
    }
Second — and this is the part most guides get wrong — msstore reconfigure does not have to be interactive. It's documented as a browser-login flow that times out in CI, but if you pass the Entra credentials as flags, it writes them to the CLI config silently and the later publish just works:
- name: Upload to Microsoft Store
  shell: pwsh
  env:
    AZURE_AD_TENANT_ID: ${{ secrets.AZURE_AD_TENANT_ID }}
    AZURE_AD_CLIENT_ID: ${{ secrets.AZURE_AD_CLIENT_ID }}
    AZURE_AD_CLIENT_SECRET: ${{ secrets.AZURE_AD_CLIENT_SECRET }}
    MS_STORE_SELLER_ID: ${{ secrets.MS_STORE_SELLER_ID }}
    MS_STORE_APP_ID: ${{ secrets.MS_STORE_APP_ID }}
  run: |
    msstore reconfigure `
      --tenantId "$env:AZURE_AD_TENANT_ID" `
      --clientId "$env:AZURE_AD_CLIENT_ID" `
      --clientSecret "$env:AZURE_AD_CLIENT_SECRET" `
      --sellerId "$env:MS_STORE_SELLER_ID"

    $msix = Get-ChildItem -Path build -Recurse -Filter "*.msix" | Select-Object -First 1
    msstore publish "$($msix.FullName)" --appId "$env:MS_STORE_APP_ID" -v
Getting the Entra ID tenant, app registration, and Partner Center linkage set up is the genuinely fiddly part — Microsoft's personal-account flow forces you through an Azure "Default Directory" and a .onmicrosoft.com admin user. That's documented step-by-step in the project's secrets guide; budget an afternoon for it the first time.
Linux → Snapcraft
After the saga of getting Huda to build as a Snap (a story I told in a separate post), automating the publish is refreshingly short. Snapcraft ships official actions:
- uses: snapcore/action-build@v1
  id: snapcraft

- name: Upload to Snapcraft Store
  if: ${{ !inputs.dry_run }}
  uses: snapcore/action-publish@v1
  env:
    SNAPCRAFT_STORE_CREDENTIALS: ${{ secrets.SNAPCRAFT_STORE_CREDENTIALS }}
  with:
    snap: ${{ steps.snapcraft.outputs.snap }}
    release: stable
The only manual touch is syncing the version from pubspec.yaml into snapcraft.yaml with sed, the same idea as the MSIX step.
Huawei AppGallery → The One That Fights Back
This is where I lost the most time, so let me save you the same hours.
AppGallery has no official upload action and no Fastlane plugin that works reliably. It has a Publishing REST API — but the API has a trap. AppGallery Connect now pushes you toward creating a Service Account (a JSON key, exactly like Google's). If you try to authenticate the Publishing API with that JSON key, you get:
client token auth failed
The Publishing API only accepts a team-level API client — a plain client_id + client_secret pair, created under a different tab in the console. The newer Service Account key is silently rejected. The console nudges you toward the thing that doesn't work.
Once you have the right credentials, the upload is a four-call dance, which I wrapped in a small Python script:
# 1. Exchange client_id/secret for an access token
# 2. GET an upload URL + authCode
# 3. POST the AAB as multipart to that URL
# 4. PUT app-file-info to attach the uploaded file to the app
The non-obvious failure is between steps 3 and 4 and the final submit. Huawei compiles the AAB server-side after you attach it, and if you submit for review before that finishes, the submission fails. There's no "compilation done" webhook, so the pragmatic fix is a deliberate wait:
if not args.no_submit:
    print("… waiting 90s for AAB server-side compilation")
    time.sleep(90)
Release notes are a separate per-locale API call. The script reuses the same whatsnew-<locale> files that Google Play consumes, mapping each filename to Huawei's locale codes:
LOCALE_MAP = {
    "whatsnew-en-US": "en_US",
    "whatsnew-ar":    "ar",
    "whatsnew-de-DE": "de_DE",
    # ...
}
for filepath in sorted(glob.glob(os.path.join(args.whatsnew, "whatsnew-*"))):
    lang = LOCALE_MAP.get(os.path.basename(filepath))
    requests.put(f"{BASE}/app-language-info?appId={app_id}",
                 headers=auth_headers,
                 json={"lang": lang, "newFeatures": text})
In the workflow, the AppGallery job simply waits for the Android build, pulls down the AAB artifact, and runs the script:
upload-appgallery:
  needs: build-android
  if: ${{ !inputs.dry_run }}
  steps:
    - uses: actions/download-artifact@v4
      with:
        name: android-aab
    - name: Upload to AppGallery
      env:
        HUAWEI_CLIENT_ID: ${{ secrets.HUAWEI_CLIENT_ID }}
        HUAWEI_CLIENT_SECRET: ${{ secrets.HUAWEI_CLIENT_SECRET }}
        HUAWEI_APP_ID: ${{ secrets.HUAWEI_APP_ID }}
      run: |
        pip install requests
        python3 distribution/appgallery_upload.py --aab app-release.aab
Reusing the already-built AAB instead of rebuilding it keeps the Android binary that ships to Huawei byte-identical to the one on Google Play.
Collecting Everything into a GitHub Release
The final job depends on all five build jobs, downloads every artifact, renames them with the version number, and cuts a GitHub Release — so even users who don't use any store can grab a binary:
create-release:
  needs: [build-android, build-ios, build-macos, build-windows, build-linux]
  if: ${{ !cancelled() && startsWith(github.ref, 'refs/tags/') }}
  steps:
    - uses: actions/download-artifact@v4
      with:
        path: release-artifacts
    - name: Prepare release assets
      run: |
        VERSION=${GITHUB_REF_NAME#v}
        cp release-artifacts/android-apk/app-release.apk "release-assets/Huda-${VERSION}-android.apk"
        # ...same for msix, pkg, snap, ipa
Note if: ${{ !cancelled() }} rather than the implicit "all succeeded" — the release is still cut if one store build fails, so a flaky Windows runner doesn't deny everyone the other five binaries.
The Whole Thing, From One Command
With every secret in place, a release is three lines:
# bump version in pubspec.yaml, commit, then:
git tag v3.4.0
git push origin master --tags
The pipeline fans out to six platforms in parallel, signs each correctly, uploads to all six stores, and publishes a GitHub Release with every binary attached. What used to be an afternoon of manual exports and six separate web dashboards is now a git push.
Key Takeaways
-
One tag, one pipeline. Trigger releases on
v*tags, not commits, and give yourself adry_runmode to test the build without touching any store. -
Base64 is the universal secret format. Keystores,
.p12certs, API keys — anything binary or multi-line becomes a base64 GitHub Secret and is decoded back to a file at runtime. -
Let the App Store Connect API key do the work.
xcodebuild -allowProvisioningUpdatesplus an API key eliminates provisioning-profile secrets entirely on iOS. -
Create throwaway keychains and always clean them up. Use
if: always()so a failed build never leaves signing material on the runner. -
msstore reconfigureworks in CI if you pass credentials as flags instead of relying on the interactive login. -
Huawei's Publishing API needs an API client, not a Service Account. The JSON key the console pushes you toward is rejected. And budget a server-side compilation wait before submitting.
-
Build once, reuse the artifact. Huawei gets the exact same AAB that Google Play does by downloading the build-android artifact, not rebuilding.
-
Pin actions by SHA. A pipeline holding your store credentials is a supply-chain target. Pin every third-party action to a full commit hash.
Frequently Asked Questions
Can one GitHub Actions workflow publish a Flutter app to all stores?
Yes. Run each platform as a separate parallel job in one workflow triggered by a version tag. Each job builds its platform's binary, signs it with secrets decoded from GitHub Secrets, and uploads to the corresponding store — Google Play, App Store, Mac App Store, Microsoft Store, Snapcraft, and Huawei AppGallery — all from a single git push --tags.
How do I sign an iOS build in CI without managing provisioning profiles?
Use xcodebuild -allowProvisioningUpdates together with an App Store Connect API key (.p8). Xcode creates and downloads the needed provisioning profiles automatically at build time, so you only need to import the signing certificate into a temporary keychain — no profile secrets required.
Why does the Huawei AppGallery Publishing API reject my credentials?
The Publishing API only accepts a team-level API client (client_id + client_secret), created under the "API client" tab in AppGallery Connect. The newer Service Account JSON key — which the console actively promotes — is rejected by the Publishing API with a client token auth failed error. Use the API client instead.
How do I upload an MSIX to the Microsoft Store in a headless pipeline?
Use the msstore CLI. Although msstore reconfigure is documented as an interactive login, passing your Microsoft Entra ID credentials as flags (--tenantId, --clientId, --clientSecret, --sellerId) configures it non-interactively. Then run msstore publish <path-to-msix> --appId <store-id>.
Should I rebuild the Android app for each store, or reuse one build?
Reuse one build. Build the AAB once in the Android job, upload it as a workflow artifact, and have the Huawei job download that same artifact. This guarantees the binary on Huawei AppGallery is byte-identical to the one on Google Play and saves a full rebuild.